I do want to get back to my MapText discussions, but thought I’d first discuss the Define Text File Server Format Utility. For those that haven’t used it, it’s the utility used to create the .tfd file for the Text Data Server inside of GeoMedia. I’ve used it a number of times over the years. Initially to create data from a matrix I developed in Excel. However more recently (the last couple of years) I use it quite often to move data from the GPS.
In the past I’ve worked with Leica’s GIS DataPRO software and very recently have begun working with Trimble’s Pathfinder Office software. Both work much the same way. Both will output the GPS data in a myriad of formats including .dgn, .shp, and .txt. Although a shapefile is the most common way to move data between different GIS environments. In fact, I’d argue that it’s really the de facto standard for sharing GIS data files for points, lines, and polygons (areas). The biggest challenge I have with shapefiles is their limitation of ten-character column names. Sure, that’s not a showstopper, but it can get annoying. Additionally I like the flexibility of being able to “fine-tune” the data to exactly how I want to see it in GeoMedia. So, instead of shapefile, I use the export to text file option. So, after setting up Pathfinder Office to export the text file with the columns that I want to capture, I exported this test text file. Here’s the output from the test text file:
“MSLINK”|”SIO_NUMBER”|”SIZE”|”DATE_CAPTURED”|”TIME_CAPTURED”|”PHOTO_NAME_1″|”PHOTO_NAME_2″|”PHOTO_NAME_3″|”PHOTO_NAME_4″|”PHOTO_NAME_5″|”PHOTO_NAME_6″|”PHOTO_NAME_7″|”PHOTO_NAME_8″|”PHOTO_NAME_9″|”PHOTO_NAME_10″|”COMMENTS”|”Max PDOP”|”Max HDOP”|”Corr Type”|”Rcvr Type”|”Datafile”|”Unfilt Pos”|”Data Dictionary Name”|”Vert Prec”|”Horz Prec”
“ID”
“Easting”|”Northing”|”MSL”
“thhuj”|”123456″|”1.5″|”01/09/08″|”14:58:25″|””|””|””|””|””|””|””|””|””|””|””|2.5|1.2|”Postprocessed Carrier Float”|”GeoXH 2005″|”R010914AIM.cor”|238|”SJWC_GPS”|0.4|0.2
76
6144978.736932|1935684.581430|174
“”|”123456″|”.75″|”01/09/08″|”15:10:47″|””|””|””|””|””|””|””|””|””|””|””|2.5|1.2|”Postprocessed Carrier Float”|”GeoXH 2005″|”R010914AIM.cor”|345|”SJWC_GPS”|0.5|0.3
77
6144982.060934|1935722.122493|173
“”|”123457″|”.75″|”01/09/08″|”15:17:22″|””|””|””|””|””|””|””|””|””|””|””|2.5|1.2|”Postprocessed Carrier Float”|”GeoXH 2005″|”R010914AIM.cor”|51|”SJWC_GPS”|0.5|0.3
78
6144961.530386|1935706.585739|174
“23456”|”123456″|”1″|”01/09/08″|”15:20:41″|””|””|””|””|””|””|””|””|””|””|””|4.2|2.1|”Postprocessed Carrier Float”|”GeoXH 2005″|”R010914AIM.cor”|150|”SJWC_GPS”|0.5|0.3
79
6144983.516451|1935710.679456|171
So, once I had the text file output in a delimited format (pipe delimited in this case), I began the creation of my .tfd file using the Define Text File Server Format Utility.
So the first screen asks you to browse for your sample text file. Furthermore, it want to know how the columns are formatted, and the row from which the actual text values begin (this is useful if you have column headers at the start of the file like in the example). I also selected a non-uniform row format since I have attributes (not including coordinates) on two separate rows.
Once you hit the Next button, you’re brought to the non-uniform row definition dialog. Note: This only comes up if you selected Non-uniform row in the first screen. Here I tell the utility that I have two rows of attributes (not including geometry) for every point shot.
After hitting the next button, I’m brought to the third screen. here I define the type of delimiter used in the text file. In my case it’s an “Other” delimiter because I use the pipe (|).
After hitting the next button I’m brought to the fourth screen. This screen just simply want me to define my easting (long)/Northing (lat) and optionally an elevation value.
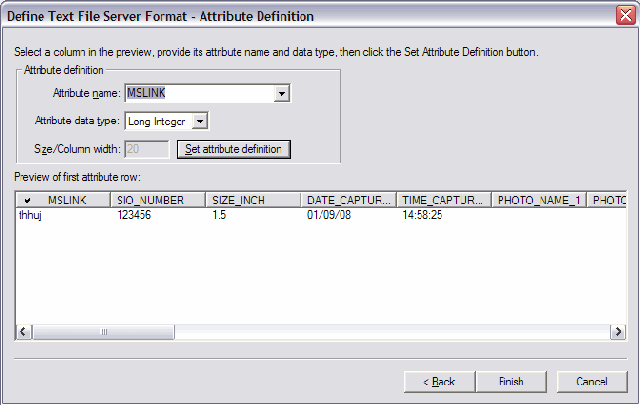
Finally on the last screen I begin to define my attributes. Here I can define column names and data types. This is what I really like about the the Define Text File Server Format utility. I can really customize the what I’m going to see in GeoMedia. A couple of notes about the interface. In my opinion, the GUI is a little awkward. It wants you to select the column, give it a name, give it a data type, and then make sure to push the Set attribute definition button. If you don’t push that button, the definition will not be saved and the column will default back to <skip>. Note: This <skip> can be useful. Especially if you’re not totally sure what types of values are going to come out of the GPS software. You might export more values than you actually might want. Instead of modifying the Trimble side, you can easily just tell the utility to skip the column and not show it in GeoMedia. I could also see this being of great value if you’re being provided a text file from a third party.
So, after you’ve defined all of your attributes, push the Finish button and save your .tfd.
Now it’s time to read the .tfd into GeoMedia. In GeoMedia go to Warehouse > New Connection. Choose Text File. That will bring up the following dialog
In the first text box, navigate to your text file. This is the text file that you used to create your.tfd file.
In the second text box, navigate to your .tfd file.
In the third text box, navigate to a coordinate system file that defines the coordinates in the text file.
After that, hit OK button. Then add your feature class using Legend > Add Legend Entries…. If all went well you should see the points in the correct position.
All in all, the functionality isn’t going to make or break a purchase of GeoMedia, but I do really think it’s a valuable tool to have in the GeoMedia toolbox.
You can download my tfd, csf, and .txt files to try it yourself.


